Global Information Tracker (GIT)
This blog explains the motivation behind using Git and then goes on to introduces some of its fundamental commands and concepts.
Introduction
Was there ever a time when you wanted to make a variety of changes to your code to see various outputs ? If so I hope you used some Git commands to make multiple branches and then build them from there.
Was there ever a situation where you were stuck with some errors in your code while trying to add something new and then you just wanted to go back to when your code was just working fine ? If so I hope you had initialised the codebase with Git and then reverted back to when it was all functional.
If you didnt understand what is Git ? What are these Git commands ? dont worry you are in the right place. Couple of years ago (2020 to be precise) even I didnt know anyone of this, but there was this event/fest taking place in my university called “Hacktoberfest”.
Back then if you had completed Hacktoberfest you were given a free T-shirt, this alone served as motivation for me to figure out what is Git ? and now after 4 years of trying to code and learning something new everyday, I have decided to blog the basics of Git so that this post can be a place on the internet that I or maybe even some else can stumble upon to either revise the various commands of Git or maybe even discover and learn a little about it.
Before we begin you might ask me, but why should I learn about this ? the answer is Git gives you the ability to collaborate with yourself or more to work on project/projects in parallel.
The above sentence was a mouthful let me just explain it to you with an example. Tomorrow lets say you and your friends go to a Hackathon. All of you would want to code together and win the competition but who would code what ? and how do we combine each others code ? do we send the code files zipped in and ask the most cracked guy in your team to integrate all those pieces together ? NO. You would make a repository (nothing but a fancy of saying a codebase) on a platform such as Github or GitLab and then make commits to the codebase and guess what the most of the software that is built on the internet by various companies and teams in them is done in the same way as to how you would collaborate with your friends with the help of git to build something.
The Basics
Git is what we call a distributed version control system (DVCS) and it was developed by Linus Torvalds back in 2005.
All the git commands that you are going to learn about below can be thought of commands that are used to manipulate files.
Installation
To start using git you first need to install or check if you have Git. The installation of Git varies based on your operating system you are on:
-
macOS comes with a version of Git pre-installed
-
Install the current version of Git from https://git-scm.com/download/win
-
$ sudo apt install git-all -
$sudo dnf install git-all
Configuration
If this is your first time using Git, you have to configure it with a username, which designates the current user as the author of the code being tracked. After opening the terminal (git bash if you are on windows) run:
$git config -global user.name <username>
followed by:
$git config -global user.email <youremail@emailprovider.com>
You can also configure your git credentials to be local by changing the flag to “-local” to know more about configurations read this git setup.
The Time Machine
Post the Installation and Configuration of Git, we need to initialise it so as to use the magic of Git for our project. For this go to the location of the codebase you want to use Git (go to its path on the terminal) in and then run:
$git init
This is creates a secret(since it is a hidden folder) folder known as .git in the current directory. .git is the watchmen that tracks all the changes (i.e. the addition and deletion of code in various files that have been deleted or created ) being made in the repository.
By tracking all the changes we can either “Revert” to the past or “Merge” into the future. However what if you do not want to track certain changes such as your credentials for an api key, executables that might be generated as the output of your code ? we can either create a .gitignore file and type in the sub-directories and files that we do not want Git to track or we could just not update the Git tracker with these files.
Tracking files is a two-stage process, this allows us to group and degroup different changes and commit these to the history. For example if you made changes in your codebase to add an authentication system and also fixed a bug, you want want two different stages in your history where you can go back to the bug fix after addition of the auth system or just to the stage where you had the auth system. By grouping changes under different categories helps us segment different stages of our development.
First we stage the file(s) using:
-
$git add <file-1> <file-2> ... <file-n> -
$git add .
Post staging the files we commit these changes to the version history using:
$git commit -m <commit message>
A good rule of thumb is, you commit a snapshot of your code for each significant addition to your project where it could be a new feature or just an upgrade. You don’t commit a snapshot if you cannot come up with a single, specific message for it.
After you have spent time on your project and made a few commits to the tracker we can view the history by running:
-
$git log -
$git log --oneline
Each commit has its own very large unique string attached to it, this helps us identify the commit and also these hash values (SHA-1 Checksum) change with any change in the codebase during its commit, this will let Git track if the data is ever corrupted or altered.
We can use the Git Machine to go back in time with:
$git checkout <commit ID>
This sets our codebase back to how it looked when we committed the code with that commit ID. Once you are satisfied with any changes that you want to make we can go back to the present with:
$git checkout main
If going through the commit IDs seems to be cumbersome you can tag the commits with:
$git tag -a <tag name> -m <commit message>
When you want to go back in time to specifc commit but dont want to erase the history before it, we use:
$git revert <commit ID>
This way we create a new commit on top of the current commit and revert back to how the codebase base looked during the previous commit and now you can build from here.
What if you are working and building on top of your current commit and now just want the code to go back to how the code was before, then we use:
$git reset --hard
This command helps undo the changes that have not yet been committed, i.e. all the tracked files content changes to the most recent commit.
To summarise if its the working directory you want to make changes in then you run the reset command but if its a commit you want to undo you run the revert command.
Branching
One of the most fundamental concepts in Git is “Branches”. Branches are made when you want to work on different things in parallel with respect to the codebase, or when you want to try new things without breaking production. Almost every software company on earth has a minimum of two branches:
(i) Production Branch: live released stable version of code being used by users
(ii) Development Branch: generally ahead of the production branch since this is where new features, bug fixes and more happens.
By running:
$git branch
you can see what branch you are currently on. If you have not made any branches till now, you will see only the main branch is present when you run this command. The “*” next to the branch denotes the branch you are present in.
Create a new branch for each major addition in your project i.e. do not create branches if you cannot give it a specific name.
Before creating a new branch checkout to the part of history where you want to branch out from, then run:
$git branch <branch name>
$git checkout <branch name>
HEAD is the pointer that git uses to tell us where we are currently working from. If you have been reading this blog seriously, a natural question that might come to you is “How does history change ? How will it look ?”. The answer to it is pretty simple, the log history reflected to you depends on the branch the HEAD is currently present on.
An easier way to wrap your head around the concept of branches is to think of them as different folders, where each branch offers you an independent line of development.
Types of Branches
To help you understand branches better, the most common types of branches are the following:
(i) Topic Branch: this branch is created to usually to work on a specific topic or task. It is typically created off the main branch and is used to isolate changes related to that topic. Once the work on the topic/task is completed, the changes in the topic branch can be merged back into the main branch. For example: these could be an improvement such as code refactoring or an experiment such as faster training.
(ii) Feature Branch: this branch is similar to a topic branch but it is specifically used to develop a new feature for the project. It is created off the main branch and is used to work on the new feature in isolation from the main codebase. Once the feature is complete, the changes can be merged back into the main branch. This branch generally is maintained for a longer duration than a Topic branch. A feature is built post the completion of multiple tasks.
(iii) HotFix Branch: this branch is generally created to address quick critical issues such as a bug or security vulnerability. It is created off the main branch or sometimes a release branch and is used to make the necessary changes. Once the fix is complete, the hotfix branch is merged back into the main branch (and possibly other active branches) to apply the fix to the codebase.
At this point, you might be asking me:
Source: Atlassian Blog: Pull Request Merge Strategies the Great Debate
Once you have learnt how to create multiple branches the next step is to merge these branches, this is where it can get really tricky very fast. (Foreshadowing Merge Conflicts).
Once you are done developing the feature in the
$git merge <new feature>
There are different types of merges that can take place. The one shown in the above gif is called Fast Forward Merge which is the most basic merge, here we move the tip of a branch to the match the tip of another branch. After this merge both the branches have same history.
For hygiene purpose, if you are not going to continue experimenting on any of the branches post merging you can delete it by performing:
$git branch -d <branch name>
Here the -d flag instructs Git to delete the branch. (key point to understand here is that Git does not delete branches which have unmerged changes).
Merge Conflict
Merge conflicts are not always linear. Similar to the concept of critical section in operating systems, if more than one branch has made changes to the same content then we have a Merge Conflict . In this situation git does not know how to combine the changes, in this case human intervention is required so as to edit and choose how we want to update.
For example if you have the font style to be Arial in one branch and Times new romain in the other, when you merge you need to choose which style you want. Here when we commit we do not use the flag -m since it is a merge conflict.
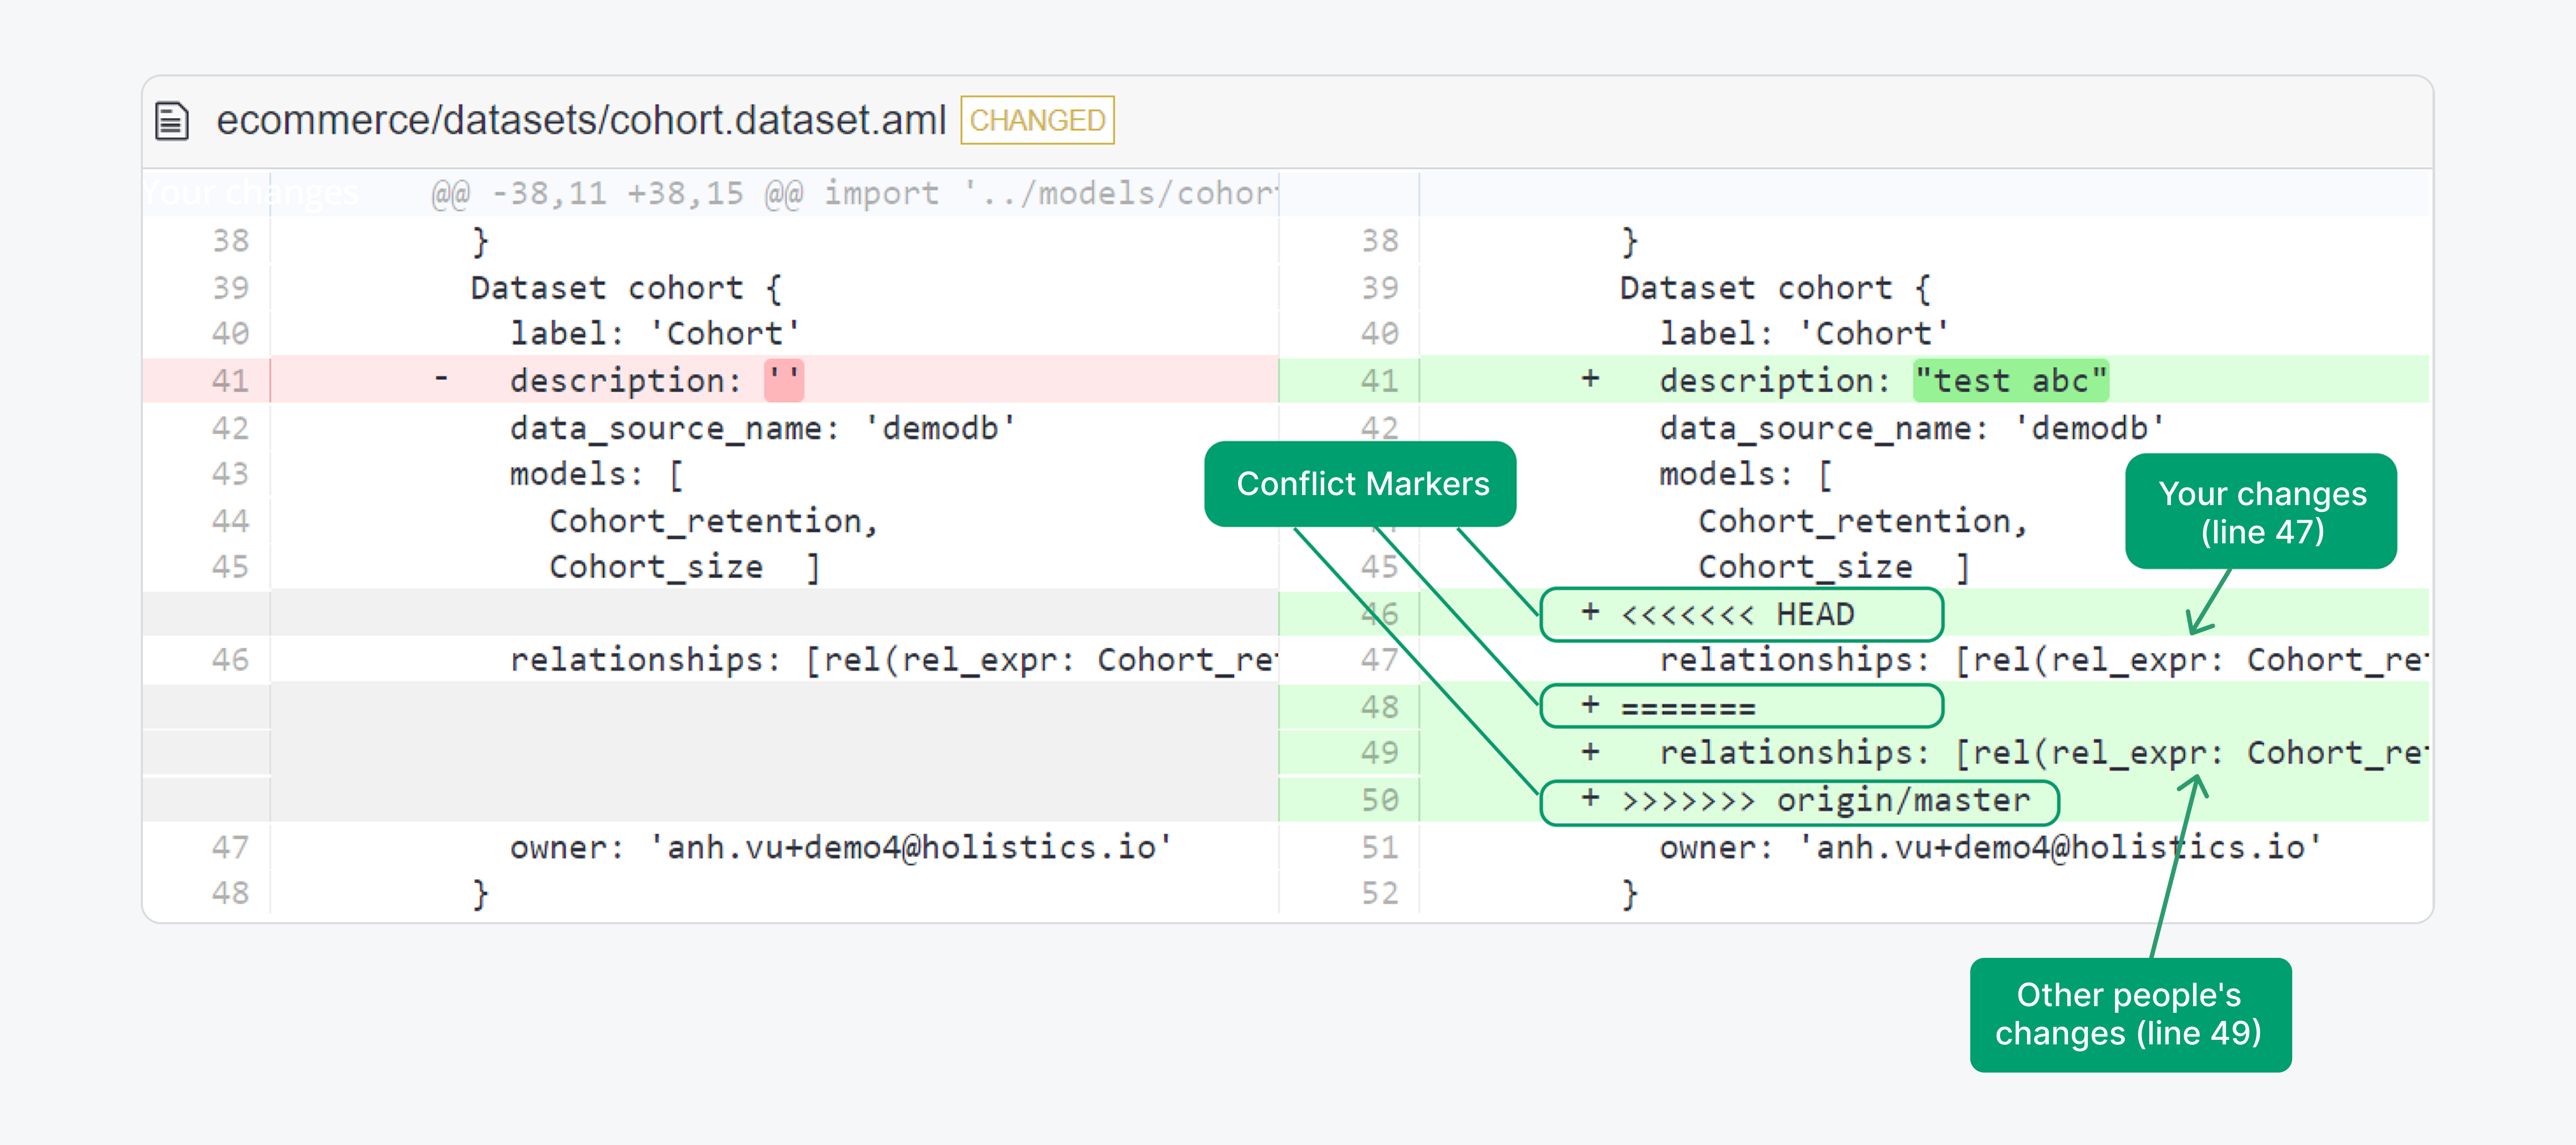
Source: Resolve Merge Conflict
As we can see in the above image Git uses «««< ======= »»»> as the markers to show us the conflict and these should be deleted before we commit the file once changes are made.
To see which files are unmerged at any point after a merge conflict, run:
$git status
3-Way Merge
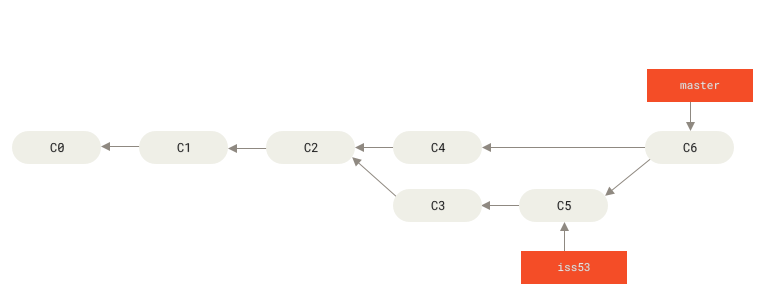
Source: Git Branching - Basic Branching and Merging
In this case, your development history between branches has diverged from some older point.Because the commit on the branch you are on is not a direct ancestor of the branch you are merging in, Git performs a 3-way merge. As seen in the image above here, instead of just moving the branch pointer forward, Git creates a new snapshot that results from this 3-way merge and automatically creates a new commit that points to it. This is referred to as a merge commit, and is special in that it has more than one parent. (during the merge a prompt shows up for you to write a reason for the merge)
You can skip the
$git add <file name>command by adding -a flag to the commit i.e.
$git commit -a -m <file name>
Note: This works only when the files are tracked, if the files are not tracked you must use the add command before the commit.
Advanced Git
In this section we explore two major concepts:
(i) Manipulating Git history
(ii) A glimpse into the internal working of Git
Git Rebase
The history of your codebase can be made linear and readable with the help of Git Rebase . The rebase command gives you the power to rewrite history. With the rebase command, you can take all the changes that were committed on one branch and replay them on a different branch. This allows you to do a fast-forward merge instead of the complex 3-way merges.
Often, you will do this to make sure your commits apply cleanly on a remote branch — perhaps in a project to which you are trying to contribute to but that you do not maintain. In this case, you would do your work in a branch and then rebase your work onto origin when you are ready to submit your patches to the main project. This way, the maintainer does not have to do any integration work — just a fast-forward or a clean apply.
Do not rebase commits that exist outside your repository and that people may have based work on.
To rebase first you checkout to the branch that you want to rebase and then rebase it to the main branch to create a linear history
 $git checkout <branch name>
 $git rebase main
If they are conflicts during the rebase Git will pause and ask you to fix those files.When performing a rebase you are not present on any branch. You deal with each of the conflict and run:
$git rebase --continue
However if you want to either skip a commit or abort the rebase you can run the following respectively:
 $git rebase --skip
 $git rebase --abort
Rebase as a technique is done in isolation. You come back to a branch post the completion of rebase.
An example of rebase with an expirement branch is shown below for a better understanding. This example is from Codeacademy - Git Rebase
Before running rebase:

We want to bring the updated changes from main into new_feature, with rebase we can keep the Git commit history clean and easy to follow. By “rebasing” the new_feature branch onto main, we move all the changes made from new_feature to the front of main and incorporate the new commits by rewriting its history.
After running rebase:

Source: how to use git rebase
In addition to this, git rebase allows us to manipulate individual commits. To get to this level of wizardry all you have to do is add -i flag to your rebase command to make the rebase interactive.
Interactive Rebase
While performing an interactive rebase we can:
- Edit commit messages
- Combine multiple commits into one (squash)
- Delete unnecessary commits
- Reorder commits
You can peform an interactive rebase:
$git rebase -i HEAD~<number of commits you want to go back to>
Running this command gives you a list of commits in your text editor that looks something like this:
pick f7f3f6d Change my name a bit
pick 310154e Update README formatting and add blame
pick a5f4a0d Add cat-file

# Rebase 710f0f8..a5f4a0d onto 710f0f8
#
# Commands:
# p, pick <commit> = use commit
# r, reword <commit> = use commit, but edit the commit message
# e, edit <commit> = use commit, but stop for amending
# s, squash <commit> = use commit, but meld into previous commit
# f, fixup <commit> = like "squash", but discard this commit's log message
# x, exec <command> = run command (the rest of the line) using shell
# b, break = stop here (continue rebase later with 'git rebase --continue')
# d, drop <commit> = remove commit
# l, label <label> = label current HEAD with a name
# t, reset <label> = reset HEAD to a label
# m, merge [-C <commit> | -c <commit>] <label> [# <oneline>]
# .       create a merge commit using the original merge commit's
# .       message (or the oneline, if no original merge commit was
# .       specified). Use -c <commit> to reword the commit message.
#
# These lines can be re-ordered; they are executed from top to bottom.
#
# If you remove a line here THAT COMMIT WILL BE LOST.
#
# However, if you remove everything, the rebase will be aborted.
#
# Note that empty commits are commented out
Source: Git Tools - Rewriting History
The interactive rebase gives you a script that it is going to run. It will start at the commit you specify on the command line (HEAD~N) and replay the changes introduced in each of these commits from top to bottom. It lists the oldest at the top, rather than the newest, because that’s the first one it will replay.
The most basic action is to combine multiple commits into a single commit by replacing pick with squash and then saving the file. When you do this, Git asks whether to replace the commit messages with a new single commit message. The edit keyword allows you to go to a specific commit and edit it.
If you finish a rebase and decide it’s not what you want or if you ever want to look at a branch that you deleted without merging or if you by mistake moved back more than intended you with the git reset command, then:
$git reflog
Reflog let’s you view all the changes you made to the repository. It is a chronological listing of our history, without regard for the repository’s branch structure. This lets us find all the dangling commits that would otherwise be lost from the project history. To retrieve commits you lost, first checkout to it’s commit id then create a branch. After that checkout to main and merge it, this way you can undo changes.
You can learn about interactive rebase here Git Tools - Rewriting History.
Stashing and Cleaning
If you want to switch to a different branch but have uncommitted changes or if you want to pull some changes but have uncommitted changes, then you would stash the code:
$git stash
This clears your working directory and stores the changes in a stash, you can view your stack of stashes with:
$git stash list
To apply these changes you perform:
$git stash apply #for the most recent stash
$git stash apply@{<N>} #for the nth stash in the stack
Having a clean working directory and applying it on the same branch is not necessary to successfully apply a stash. You can save a stash on one branch, switch to another, and try to apply the changes here. You can also have modified and uncommitted files in your working directory when you apply a stash — Git may detect updated or uncommitted files in your working directory, resulting in merge conflicts that you would have to resolve.
If you want an easier way to test the stashed changes again, you can run:
$git stash branch <new branch name>
this creates a new branch for you, checks out the commit you were on when you stashed your work, reapplies your work there, and then drops the stash if it applies successfully.
If you end up having many untracked files from a result of different merges and progress in work, then you can clean your repo by removing them. This can be done in multiple ways:
$git stash --all #to stash all the untracked files
$git clean -f -d #to delete all the untracked files and sub-directories
However once you run the clean command there is no going back, generally always run it with a -n which performs a dry run and informs as to what would be removed and once you are sure change the -n to a -f to do it for real.
$git stash -d -n #dry run
$git clean -f -d #post double checking clean them
Conclusion
Congratulations ! for making it this far. This was a long article, it just turned out this way. The main motivation behind this blog is to be a one stop shop to go from not knowing anything about git to being able to use it. However this blog will not make you a Git expert overnight. Infact to learn more about collaborting with different developers read this Git on the Server - The Protocols and Distributed Git - Distributed Workflows (Strongly Recommended!).
Remember that as you migrate these skills to real-world projects, Git is merely a tool for tracking your files, not a cure-all for managing software projects. No amount of intimate Git knowledge can make up for a haphazard set of conventions within a development team.
Understand exactly what any other piece of Git documentation is trying to convey. With all of these convenient features, it is easy to get so caught up in designing the perfect workflow that you lose sight of Git’s underlying purpose. As you add new commands to your repertoire, remember that Git should always make it easier to develop a software project—never harder.
If you ever find that Git is causing more harm than good, don’t be scared to drop some of the advanced features and go back to the basics. Pat yourself on the back for sticking through the blog and understanding a portion of Global Information Tracker aka Git.
References
I hope that you now have some picture of Git’s numerous capabilities. I have shared links of some of the resources I have used to develop this blog and also a few you can into to dive into the depths of Git.
- Pro Git Book
- Git Documentation
- Ry’s Git Tutorial Book
- Interactive Git Branching Tutorials
- Git CheatSheet
- Atlassian Blog Merge Strategies
- CodeAcademy Git Rebase
- Holistics Resolve Merge Conflict
If you have made it this far, mail me your feedback with the subject Git blog 808.
I hope you enjoyed the journey of trying to understand Git a little better : )